This is a guest post + code, wrote together with Joe D’Andrea from LiquidJoe LLC!
Many developers new to the iOS platform have trouble understanding the delegate architecture, in the sense that many other OO toolkits use properties to configure the characteristics of UI elements, instead of having a separate object doing the job.
When using delegates, the sequence of calls for each method is important: most Cocoa developers know that UITableView instances call delegate and data source methods roughly in this order:
- numberOfSections:
- numberOfRows:inSection:
- cellForRowAtIndexPath:
- configureCellAtIndexPath:
…mixing up in the middle some calls to headers and footers and cell sizes as well. Which prompts the following question: what is really going on behind the scenes? Can we know exactly the order in which those delegate methods are called?
Here’s a small project that uses all the delegate and datasource methods in the same project, and that uses NSLog to show which calls happen first, and when.
Delegate Methods
But first, a quick recap on delegate methods in Objective-C.
In many (if not most) object oriented toolkits, properties tend to be used when setting up an object such as a table view, for instance in .NET, as shown in this example from Microsoft
<%@ Page language="c#" %>
<%@ Import Namespace="System.Data" %>
<%@ Import Namespace="System.Data.SqlClient" %>

<script runat="server">
void Page_Load(Object sender, EventArgs e)
{
    SqlConnection cnn = new
        SqlConnection("server=(local);database=pubs;Integrated Security=SSPI");
    SqlDataAdapter da = new SqlDataAdapter("select * from authors", cnn);
    DataSet ds = new DataSet();
    da.Fill(ds, "authors");
    Repeater1.DataSource = ds.Tables["authors"];
    Repeater1.DataBind();
}
</script>
<html>
<body>
    <form id="WebForm2" method="post" runat="server">
        <asp:Repeater id="Repeater1" runat="server">
            <ItemTemplate>
            <%# DataBinder.Eval(Container.DataItem,"au_id") %><br>
            </ItemTemplate>
        </asp:Repeater>
    </form>
</body>
</html>
In the code above (a classic ASP.NET page) the Repeater1 instance (of
the Repeater class, which is a view component) is “bound” (a classic
example of “databinding”) to an instance of a DataSet. In this case,
we just call the .DataBind() method on the repeater object, and the
view component is filled with the data inside.
The advantage of this approach is that it is simpler from the point of view of the developer; a couple of lines of code are usually enough. However, this design tends to break the MVC model, because it creates a direct dependency between the model and the view component. This coupling makes it hard to modify the model of the application without breaking the view layer.
In Objective-C this pattern is seldom used. Instead, an object will opt to let someone else do the job for them. That other object is known as the delegate object, and the methods to be implemented (sometimes optionally) are referred to as a protocol. In this model, there is a controller object that acts as intermediate between the view and the model, effectively creating a decoupled MVC architecture.
In Objective-C, an object tells the compiler that it implements a protocol using this syntax:
@interface MyAppDelegate : NSObject <UIApplicationDelegate>
@end
The inclusion of <UIApplicationDelegate> signals that this class
conforms to the UIApplicationDelegate protocol. Meanwhile, in
UIApplication.h, you will see this:
@protocol UIApplicationDelegate <NSObject>
@optional

- (void)applicationDidFinishLaunching:(UIApplication *)application;
- (BOOL)application:(UIApplication *)application didFinishLaunchingWithOptions:(NSDictionary *)launchOptions __OSX_AVAILABLE_STARTING(__MAC_NA,__IPHONE_3_0);

...
@end
Thus, MyAppDelegate.m may optionally respond to
-applicationDidFinishLaunching: and
-application:didFinishLaunchingWithOptions:. (In this particular case,
be aware that the former method is used by apps prior to iOS 3.0, and
that the latter method should now be used instead.)
More about Delegates
It is up to the class in question to determine when to call a delegate method, and in what order. This order is of particular interest when it comes to iOS Table Views. In fact, go ahead and press Cmd-Shift-O in Xcode right now. Search for and open UITableView.h.
Look inside. There’s a lot to take in here! In fact, that’s a good idea
- take a moment to browse this header. (Go ahead. We’ll wait.) A Cocoa developer can write apps and never look once inside these header files. To borrow (abuse?) a classic Apple mantra, we code different. We want to get our hands dirty and look inside at the engine … or at least as much of it as possible. The instance variables are out of our reach, but there are plenty of other things to take in.
UITableView is unusual in that it declares two protocols, whereas most classes you come across will only declare one.
The UITableViewDelegate is responsible for mediating all table cell display and behavior. A quick look at the protocol makes this abundantly clear. There are methods covering custom display, variable height, headers and footers, accessories, selection, editing, reordering, and indentation.
@protocol UITableViewDelegate <NSObject, UIScrollViewDelegate>
UITableViewDataSource represents the data model object. While it supplies no information about appearance – of the cells or otherwise – this doesn’t mean it avoids cells altogether. There are methods covering cell view creation (and, more importantly, reuse), the number of sections and rows, titles for headers and footers, index titles along the right-hand side, plus cell editing, insertion, deletion, and moving.
In this protocol, two methods are required:
- (NSInteger)tableView:(UITableView *)table numberOfRowsInSection:(NSInteger)section;
- (UITableViewCell *)tableView:(UITableView *)tableView cellForRowAtIndexPath:(NSIndexPath *)indexPath;
The rest are optional. That’s right, even -numberOfSectionsInTableView:, which you almost always see implemented like so:
- (NSInteger)numberOfSectionsInTableView:(UITableView *)tableView
{
    return 1;
}
However, the header tells us that the default value is 1 if this is not implemented! If all you have is one section, save yourself some extra coding and leave it out. Aren’t well-documented header files great?
Now there has to be some degree of bootstrapping involved with setting up these delegates. This is accomplished via properties:
@property (nonatomic,assign) id <UITableViewDataSource> dataSource;
@property (nonatomic,assign) id <UITableViewDelegate>   delegate;
… and usually set to self:
// Set the table view and data source delegates:
myTableView.delegate = self;
myTableView.dataSource = self;
If you use a UITableViewController, this is done for you automagically, in addition to several other niceties. (We heart UITableViewController. Use it early. Use it often!)
Delegate Method Call Order
Great. So we have two delegate objects that can receive almost 30 method calls combined. Not five. Not ten. Thirty. Helpful as the delegate design pattern is, it’s easy to get confused knowing which method will be called at which time. Thus, it can also be instructive to know what order these methods are called.
You can probably guess a few of them right off the bat. For instance, -tableView:numberOfSections: is likely called before -tableView:numberOfRows:inSection:. It’s not always so clear cut, though.
So how do we trace Objective-C messages anyway? One possibility is to set up an Xcode breakpoint and declare this as an action (borrowed from StackOverflow):
while 1
printf "[%s %s]", (char *)object_getClassName($r0), (char *) $r1
c
end
Hmm … maybe not.
Is it possible to trace Objective-C messages en masse? As a matter of fact, it is:
On the iPhone Simulator, you can compile with the
NSObjCMessageLoggingEnabled Foundation environment variable set to
YES, then look in /tmp/msgSends-<pid> (where
You’ll also get a deluge of messages, accent on deluge.
What else? You could use (the undocumented)
-instrumentObjcMessageSends: to toggle logging on and off.
Hmm. This isn’t looking so good. “There’s got to be a better way!”
We can certainly drop breakpoints in each of our delegate methods and trace through them, but wouldn’t it be nice to just log the call order of our class delegates in one swell foop, without resorting to undocumented or cumbersome means?
Using an NSProxy
Of course there is. That’s why we wrote this blog post, after all, so we’re going to show you how it’s done. Best of all, you can use this technique for any class. Roll up your sleeves and let’s get started.
[This code is adapted from http://blog.jayway.com/2009/03/06/proxy-based-aop-for-cocoa-touch/]
Remember, we’re operating under the notion that you know your way around Xcode and have already built a project or two! In Xcode, create a new “Master-Detail” iOS Application called DelegateOrder. We’re going to use a PTV prefix for all of our classes (why? Long story :)
Thanks to the wonders of modern template technology, our root view controller happens to be a table view. How convenient!
Time to create a new class. Right-click on the Classes group in Xcode, and choose New File… from the popup menu. Add an Objective-C Cocoa Touch subclass of NSObject, and name it PTVControllerProxy. Open PTVControllerProxy.h and change it to look like this:
@interface PTVControllerProxy : NSProxy

+ (id<UITableViewDataSource, UITableViewDelegate>)proxyWithTableViewController:(UITableViewController *)controller;
- (id)initWithTableViewController:(UITableViewController *)controller;

@end
Notice anything different?
We have not so secretly replaced the NSObject Xcode usually serves with a dark, sparkling NSProxy object. (Footnote: This is a cultural reference to a famous Folgers coffee commercial that ran in the US in the ’80s. Not sure if it aired worldwide though!) Like NSObject, NSProxy is a root class, except it also conforms to NSObject, plus it adds a few methods of its own. Here’s the header:
#import <Foundation/NSObject.h>

@class NSMethodSignature, NSInvocation;

@interface NSProxy <NSObject> {
    Class	isa;
}

+ (id)alloc;
+ (id)allocWithZone:(NSZone *)zone;
+ (Class)class;

- (void)forwardInvocation:(NSInvocation *)invocation;
- (NSMethodSignature *)methodSignatureForSelector:(SEL)sel;
- (void)dealloc;
- (void)finalize;
- (NSString *)description;
+ (BOOL)respondsToSelector:(SEL)aSelector;

@end
NSProxy objects act as stand-ins for other objects. In our case, we’ll use PTVControllerProxy as our table view’s dataSource and delegate. It will also know about our actual Table View Controller (and table view) so that it can pass messages down the line.
The next item of interest is our private instance variable, _controller, a pointer to a UITableViewController object.
Following the Coding Guidelines for Cocoa, we always make our instance variables private. We also add a leading underscore – just like Apple does with their own headers – so as to distinguish them from properties. This further enforces class interaction through properties and methods. Meanwhile, on the implementation side, sometimes you want to access the instance variable. Other times, you need to use the property. Underscores make it clear which is which.
In this case, we’re not creating a property … at least not one that’s publicly available. More on that later.
We’ve also defined one class method and one instance method:
+ (id<UITableViewDataSource, UITableViewDelegate>)proxyWithTableViewController:(UITableViewController *)controller;
Our class method takes a UITableViewController and returns an object that conforms to both the Table View Data Source and Delegate protocols.
- (id)initWithTableViewController:(UITableViewController *)controller;
Our designated initializer method (called by the class method) does the deed of setting our controller property.
Did we mean _controller instance variable? No, we meant property. Now press Cmd-Option-Up-Arrow to switch to the implementation file and make it look like this:
#import "PTVControllerProxy.h"

@interface PTVControllerProxy ()

@property (nonatomic, assign) UITableViewController *controller;

- (void)logInvocation:(NSInvocation *)invocation;

@end


@implementation PTVControllerProxy

@synthesize controller = _controller;

@end
Ah-ha! So that’s where the property went.
We have included yet another interface declaration for PTVControllerProxy, and this time we’re extending it beyond what we originally declared in the header. The parentheses after @interface PTVControllerProxy signify that this is a class extension. In this case, we’ve declared a property and a method that isn’t exposed to the outside world. It’s not private per se, but it’s not visible in the header either. Next, in the implementation, we’ve synthesized a property named controller, which is represented by the instance variable named _controller.
Due to the architecture of Objective-C, you could make a few end-runs around this and still get at the property and methods. You just have to know how they’re defined. Be careful of doing this with Apple’s classes though. Them’s grounds for App Store rejection!
You can even override extensions previously defined in the header, making this technique quite handy for exposing readwrite properties as readonly. Read more about Categories and Extensions in The Objective-C Programming Language.
We’ll discuss -logInvocation: in a moment, but you probably have a
good idea of what it will do just by looking at the name.
Time to add our methods. Heads up: Some of these may – or will – be a bit unfamiliar. All we are doing here is implementing the minimum number of methods to handle proxying for our table view controller, and then some.
The following should be added between @synthesize and @end in our class implementation. First, we add our previously defined initializers, and our lone NSObject method:
#pragma mark - Initializers

+ (id<UITableViewDataSource, UITableViewDelegate>)proxyWithTableViewController:(UITableViewController *)controller
{
    return [[[[self class] alloc] initWithTableViewController:controller] autorelease];
}

- (id)initWithTableViewController:(UITableViewController *)controller
{
    self.controller = controller;
    return self;
}

#pragma mark - NSObject

- (void)dealloc
{
    [_controller release];
    [super dealloc];
}
Our class method takes a table view controller and sends it along to the
designated initializer, which in turn assigns it to the property
controller, and returns itself. As there is no superclass to worry
about, there is no use of [super init] here.
There’s one more benefit to our use of private instance variables beginning with underscores. Our method parameters do not conflict with like-named instance variables! Look at this line again:
self.controller = controller;
This dot notation is 100% equivalent to:
[self setController:controller];
Very clean, consistent, and easy to read. Contrast this with the scenario where our instance and method variable named matched. We would have to code methods like this:
- (id)initWithTableViewController:(UITableViewController *)theController
{
    self.controller = theController;
    return self;
}
It should also be pointed out that these method names are not haphazard. Apple does in fact provide a method (pun intended) for naming methods! The previously mentioned Coding Guidelines for Cocoa tells all. Take the time to name your instance variables, properties, and methods according to the guidelines. It’s worth the effort!
The dealloc method is also standard-issue. Notice that we work with the instance variable at this point. After dealloc, the show’s over for this class, so we don’t even bother setting _controller to nil. In other cases, you would likely want to clear it, using the property to take advantage of its retain/release smarts in one step:
// This setter (-setController:) releases _controller for us!
self.controller = nil;
Continuing with our NSObject methods, add the following:
- (BOOL)isKindOfClass:(Class)aClass;
{
    return [self.controller isKindOfClass:aClass];
}

- (BOOL)conformsToProtocol:(Protocol *)aProtocol;
{
    return [self.controller conformsToProtocol:aProtocol];
}

- (BOOL)respondsToSelector:(SEL)aSelector;
{
    return [self.controller respondsToSelector:aSelector];
}
Be careful here. There are class methods with the same signature like NSProxy’s +respondsToSelector:! We’re responding to NSObject’s protocol methods instead, passing (well, proxying) the parameter over to our table view controller. This takes care of establishing our proxy as having the same class, protocol conformance, and selector response. That, in turn, assures us an opportunity to tap in to the deluge of table view delegate traffic.
Now, so we just discussed how you can avoid naming collisions between method parameters and instance variables, and here we have aClass, aProtocol, and aSelector! This leads us to an important maxim: “You have to know the rules before you can break them.” Use discretion! Here, we’re honoring the naming convention established by the authors of NSObject.h, in particular the NSObject protocol.
As it turns out, the Protocol and Base Class declarations of
-conformsToProtocol: are ever so slightly different:
// Protocol
- (BOOL)conformsToProtocol:(Protocol *)aProtocol;

// Base Class
+ (BOOL)conformsToProtocol:(Protocol *)protocol;
Go figure. (It’s OK. We still love Cocoa. Tasty Cocoa …)
Let’s add two more, slightly longer methods, this time from NSProxy’s protocol:
#pragma mark - NSProxy

- (NSMethodSignature *)methodSignatureForSelector:(SEL)aSelector
{
    if ([self.controller respondsToSelector:aSelector])
    {
        return [self.controller methodSignatureForSelector:aSelector];
    }
    else
    {
        return [super methodSignatureForSelector:aSelector];
    }
}
Method signatures help us forward along messages we otherwise wouldn’t respond to. Here, the message is either bound for our table view controller or the superclass.
- (void)forwardInvocation:(NSInvocation *)invocation
{
    SEL selector = [invocation selector];
    if ([self.controller respondsToSelector:selector])
    {
        [self logInvocation:invocation];
        [invocation setTarget:self.controller];
        [invocation invoke];
    }
}
-forwardInvocation: is used by subclasses to send Objective-C
messages-as-objects (or Invocations) to other objects. For the proxy,
it’s just a matter of passing the message along to whatever object we
aim to represent. That object, of course, is the table view controller.
First, we ensure the controller responses to the selector represented by the invocation. Then, just before we dispatch the invocation using -invoke, we call - ta-dah - our private -loginvocation: method. With that, we can now log every single solitary table view controller message that comes our way, all from one place.
Oh, and look, it’s invocation and not anInvocation. (You’re not going to let us live this one down, are you.)
At last, we come to the coup de grace of our controller proxy class. Add this to the implementation:
#pragma mark - Private
- (void)logInvocation:(NSInvocation *)invocation
{
SEL selector = [invocation selector];
NSString *currentMethod = NSStringFromSelector(selector);
NSString *argument = @"";
NSMethodSignature *methodSignature = [invocation methodSignature];
NSInteger argCount = [methodSignature numberOfArguments];
for (NSInteger index = 3; index < argCount; ++index)
{
const char *argType = [methodSignature getArgumentTypeAtIndex:index];
if (strcmp(argType, "@") == 0)
{
id object = nil;
[invocation getArgument:&object atIndex:index];
if ([object isKindOfClass:[NSIndexPath class]])
{
NSIndexPath *indexPath = (NSIndexPath *)object;
argument = [NSString stringWithFormat:@"{%d, %d}", indexPath.section, indexPath.row];
}
}
else if (strcmp(argType, "i") == 0)
{
NSInteger section;
[invocation getArgument:§ion atIndex:index];
argument = [NSString stringWithFormat:@"%d", section];
}
}
NSLog(@"%@%@", currentMethod, argument);
}
OK! A lot to take in here. Let’s talk through it.
Just like in -forwardInvocation:, we grab our selector, or in this case
our delegate message. In preparation for logging, we turn it into a
string called currentMethod. This gives us, for example,
@“tableView:cellForRowAtIndexPath:” - ready for logging.
Perhaps that would be enough, but we can do better. NSInvocation contains a NSMethodSignature object with all the arguments, so let’s grab a few of those while we’re at it.
If you were to look at the method signature’s arguments, you would soon discover the first two arguments are always claimed by a few behind-the-scenes players, (id)self and (SEL)_cmd. Argument indices are zero-based, so that places us at index 2 for the start of our delegate methods. Meanwhile, following best practices for delegate method conventions, the table view is always passed back as the first argument, in this case index 2. Thus we want to start at index 3, which should explain this loop construct:
for (NSInteger index = 3; index < argCount; ++index)
{
    const char *argType = [methodSignature getArgumentTypeAtIndex:index];
...
Next, we look at the argument type, returned as constant C string representing an Objective C argument type. “@” represents an object, and “i” represents an integer. Easy enough.
If we have an object, we check to see if it’s of class NSIndexPath. If so, good! We grab the index path’s row and section, and use that in the log message. If we have an integer, we simply grab the integer value instead.
What if we have no such argument, as in -numberOfSectionsInTableView? No worries, we’ll still log the message. We just won’t have any of these parameters to go along with it.
Finally, we log our method and our (possible) lone argument. At last, the controller proxy is complete.
We now turn our attention to our table view controller, represented here by PTVRootViewController. Open the header file first, and change it to look like this:
#import <UIKit/UIKit.h>

@interface PTVRootViewController : UITableViewController
{
@private
    id<UITableViewDataSource, UITableViewDelegate> _proxy;
}

@end
We’ve merely added a private instance variable for the proxy object. Notice that there is no publicly exposed property. We will only be using the proxy within the confines of the class.
Now switch to the implementation file and … remove everything. Nothing wrong with the pre-fab code here. We’re just going to start over. Add this for starters:
#import "PTVRootViewController.h"
#import "PTVControllerProxy.h"

static NSInteger SECTION_COUNT = 25;
static NSInteger ROW_COUNT = 5;
We first import our class header, as well as the proxy header. Next, because we’re testing out the proxy, we can keep the data source rather sparse and simple, but we still want a good number of rows and sections to work with. We define a few constants to this effect, giving us 25 table view sections, each one with five rows.
Time for another private extension:
@interface PTVRootViewController ()

@property (nonatomic, retain) id<UITableViewDataSource, UITableViewDelegate> proxy;

@end


@implementation PTVRootViewController

@synthesize proxy = _proxy;

@end
There it is, our internal proxy property, and a bare-bones implementation, complete with synthesized methods. Next up is our requisite NSObject method:
#pragma mark - NSObject

- (void)dealloc
{
    [_proxy release];
    [super dealloc];
}
Nothing earth-shattering there. Next up, a bunch of UIViewController methods:
#pragma mark - UIViewController

- (void)viewDidLoad
{
    [super viewDidLoad];

    self.proxy = [PTVControllerProxy proxyWithTableViewController:self];
    self.tableView.dataSource = self.proxy;
    self.tableView.delegate = self.proxy;

    self.title = @"Delegate Call Order";
    self.navigationItem.rightBarButtonItem = self.editButtonItem;
}
In -viewDidLoad, we create and connect the proxy object. We also take a moment to set the associated navigation bar’s title and add a stock edit button on the right side.
- (void)viewDidUnload
{
}

- (void)viewWillAppear:(BOOL)animated
{
    [super viewWillAppear:animated];
}

- (void)viewDidAppear:(BOOL)animated
{
    [super viewDidAppear:animated];
}

- (void)viewWillDisappear:(BOOL)animated
{
    [super viewWillDisappear:animated];
}

- (void)viewDidDisappear:(BOOL)animated
{
    [super viewDidDisappear:animated];
}

- (BOOL)shouldAutorotateToInterfaceOrientation:(UIInterfaceOrientation)interfaceOrientation
{
    return (interfaceOrientation == UIInterfaceOrientationPortrait);
}
We’ll disable autorotation for now, so we only respond to portrait orientation requests.
- (void)didReceiveMemoryWarning
{
    [super didReceiveMemoryWarning];
}
At last! Time to add the delegate methods. All of them. That’s right, we will respond to every single one. In doing so, the proxy will get a chance to work its logging magic. Add the following for starters:
#pragma mark - UITableViewDataSource

- (NSInteger)numberOfSectionsInTableView:(UITableView *)tableView
{
    return SECTION_COUNT;
}

- (NSArray *)sectionIndexTitlesForTableView:(UITableView *)tableView
{
    NSMutableArray *array = [NSMutableArray arrayWithCapacity:SECTION_COUNT];
    for (NSInteger index = 0; index < SECTION_COUNT; ++index)
    {
        NSString *sectionTitle = [NSString stringWithFormat:@"%d", index];
        [array addObject:sectionTitle];
    }
    return array;
}
Our table view has SECTION_COUNT sections. The section index titles
(along the right side of the table view) will be represented by our
section numbers 0 through 24. This will make it easy to see the effects
of changing our vantage point.
Let’s add a few more:
- (BOOL)tableView:(UITableView *)tableView canEditRowAtIndexPath:(NSIndexPath *)indexPath
{
    return YES;
}

- (BOOL)tableView:(UITableView *)tableView canMoveRowAtIndexPath:(NSIndexPath *)indexPath
{
    return YES;
}
We allow editing and moving of all rows.
- (UITableViewCell *)tableView:(UITableView *)tableView cellForRowAtIndexPath:(NSIndexPath *)indexPath
{
    static NSString *CellIdentifier = @"Cell";

    UITableViewCell *cell = [tableView dequeueReusableCellWithIdentifier:CellIdentifier];
    if (cell == nil)
    {
        cell = [[[UITableViewCell alloc] initWithStyle:UITableViewCellStyleDefault reuseIdentifier:CellIdentifier] autorelease];
    }

    cell.textLabel.text = [NSString stringWithFormat:@"Section %d, row %d", indexPath.section, indexPath.row];

    return cell;
}
Here is where the cell generation and reuse takes place. Again, nothing surprising here. We take advantage of our table view’s cell queue and either dequeue or create a cell, setting its text label to the current cell’s section and row.
- (void)tableView:(UITableView *)tableView commitEditingStyle:(UITableViewCellEditingStyle)editingStyle forRowAtIndexPath:(NSIndexPath *)indexPath
{
    if (editingStyle == UITableViewCellEditingStyleDelete)
    {
        [tableView deleteRowsAtIndexPaths:[NSArray arrayWithObject:indexPath] withRowAnimation:UITableViewRowAnimationFade];
    }
    else if (editingStyle == UITableViewCellEditingStyleInsert)
    {
    }
}
Since we’re allowing editing (and by editing we mean deletion of cells, not insertion), we’ll respond to this method as well, deleting the row indicated by the indexPath, fading it out as it goes.
- (void)tableView:(UITableView *)tableView moveRowAtIndexPath:(NSIndexPath *)fromIndexPath toIndexPath:(NSIndexPath *)toIndexPath
{
}

- (NSInteger)tableView:(UITableView *)tableView numberOfRowsInSection:(NSInteger)section
{
    return ROW_COUNT;
}

- (NSInteger)tableView:(UITableView *)tableView sectionForSectionIndexTitle:(NSString *)title atIndex:(NSInteger)index
{
    return [title intValue];
}
We respond to -tableView:moveRowAtIndexPath:toIndexPath: as well.
Since we aren’t manipulating any behind-the-scenes data, we don’t need
to do anything extra. We also offer up ROW_COUNT rows in each section.
Next, we take advantage of our section index titles (which are just
numbers represented as strings), converting them back to integers as
needed. index is meant to be used with our index title array, which of
course we aren’t keeping track of. Then again, it’s simple enough that
we don’t have to. Each index title maps directly to a like-numbered
section in the table view, so it’s as simple as returning each title’s
integer value.
Two more data source methods and we’re more than halfway there.
- (NSString *)tableView:(UITableView *)tableView titleForFooterInSection:(NSInteger)section
{
    return [NSString stringWithFormat:@"Footer for section %d", section];
}

- (NSString *)tableView:(UITableView *)tableView titleForHeaderInSection:(NSInteger)section
{
    return [NSString stringWithFormat:@"Header for section %d", section];
}
Easy peasy, right? Good! Now for the table view delegate methods. These are even easier:
#pragma mark - UITableViewDelegate

- (void)tableView:(UITableView *)tableView accessoryButtonTappedForRowWithIndexPath:(NSIndexPath *)indexPath
{
}

- (void)tableView:(UITableView *)tableView didDeselectRowAtIndexPath:(NSIndexPath *)indexPath
{
}

- (void)tableView:(UITableView *)tableView didEndEditingRowAtIndexPath:(NSIndexPath *)indexPath
{
}

- (void)tableView:(UITableView *)tableView didSelectRowAtIndexPath:(NSIndexPath *)indexPath
{
    [self.tableView deselectRowAtIndexPath:indexPath animated:YES];
}

- (UITableViewCellEditingStyle)tableView:(UITableView *)tableView editingStyleForRowAtIndexPath:(NSIndexPath *)indexPath
{
    return UITableViewCellEditingStyleDelete;
}
A few more empty methods, again just to get the benefit of logging. We will also deselect each row in response to it being selected. Next, we assure that the editing style of each row supports deletion.
Now we’ll handle header, footer, and row sizing, plus indentation:
- (CGFloat)tableView:(UITableView *)tableView heightForFooterInSection:(NSInteger)section
{
    return 20.0f;
}

- (CGFloat)tableView:(UITableView *)tableView heightForHeaderInSection:(NSInteger)section
{
    return 20.0f;
}

- (CGFloat)tableView:(UITableView *)tableView heightForRowAtIndexPath:(NSIndexPath *)indexPath
{
    return 44.0f;
}

- (NSInteger)tableView:(UITableView *)tableView indentationLevelForRowAtIndexPath:(NSIndexPath *)indexPath
{
    return 0;
}

- (BOOL)tableView:(UITableView *)tableView shouldIndentWhileEditingRowAtIndexPath:(NSIndexPath *)indexPath
{
    return YES;
}
Returning YES for -tableView:shouldIndentWhileEditingRowAtIndexPath:
allows the background of the edited row to be indented. This allows the
cell contents to shift and more gracefully accomodate the Delete button
appearing on the right-hand side.
- (NSIndexPath *)tableView:(UITableView *)tableView targetIndexPathForMoveFromRowAtIndexPath:(NSIndexPath *)sourceIndexPath toProposedIndexPath:(NSIndexPath *)proposedDestinationIndexPath
{
    return proposedDestinationIndexPath;
}
We won’t do anything unusual with proposed moving of cells, so we return the proposed destination index path.
- (NSString *)tableView:(UITableView *)tableView titleForDeleteConfirmationButtonForRowAtIndexPath:(NSIndexPath *)indexPath
{
    return @"Delete";
}

- (UIView *)tableView:(UITableView *)tableView viewForFooterInSection:(NSInteger)section
{
    return nil;
}

- (UIView *)tableView:(UITableView *)tableView viewForHeaderInSection:(NSInteger)section
{
    return nil;
}
The delete confirmation button will remain @“Delete”, and we won’t be using views for the section headers or footers. Still, we need to implement these methods if we are to see them logged!
Four more methods to go, and our implementation is finished:
- (void)tableView:(UITableView *)tableView willBeginEditingRowAtIndexPath:(NSIndexPath *)indexPath
{
}

- (NSIndexPath *)tableView:(UITableView *)tableView willDeselectRowAtIndexPath:(NSIndexPath *)indexPath
{
    return indexPath;
}

- (void)tableView:(UITableView *)tableView willDisplayCell:(UITableViewCell *)cell forRowAtIndexPath:(NSIndexPath *)indexPath
{
}

- (NSIndexPath *)tableView:(UITableView *)tableView willSelectRowAtIndexPath:(NSIndexPath *)indexPath
{
    return indexPath;
}
Executing the Code
Congratulations! Let’s take it for a spin in the Simulator. Before building your project, bring up the debugger console window by typing Shift-Cmd-R or selecting Run > Console from the menu. Move the console off to the side so that you can see what happens next. You might even want to venture a guess as to which messages and parameters you’ll see first. Place your bets!
Now Build and Run your project using the Debug configuration. The Simulator will launch and the console will soon be filled with a bunch of log messages. Do not use the Simulator just yet. Let’s focus on the console.
Thankfully, they will only be concerning our table view controller delegates. (Otherwise, we would be positively buried with messages. You think this is a lot of messages, you should see what Objective-C deals with in a typical app’s lifetime!)
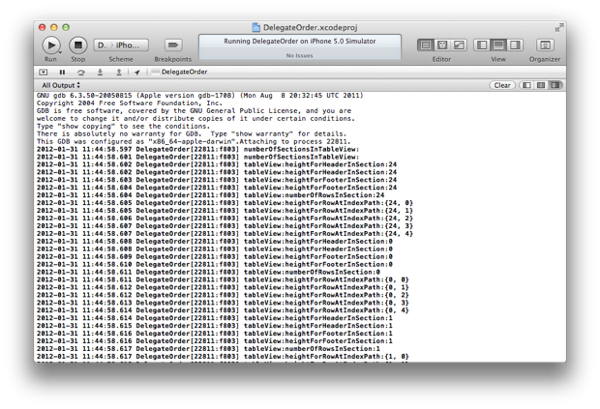
Let’s start at the top and see what we have here. (We have removed the timestamp and App specific info. Your log lines will be a bit lengthier by comparison. You might want to make the console window a bit wider to help keep the lines from wrapping.)
numberOfSectionsInTableView:
numberOfSectionsInTableView:
The first thing we’re asked for is the number of sections in our table view … and we’re asked for this information twice. (Your guess is as good as ours.)
Remember, we have 24 sections in our table view.
tableView:viewForHeaderInSection:24
tableView:titleForHeaderInSection:24
tableView:heightForHeaderInSection:24
tableView:heightForHeaderInSection:24
tableView:viewForFooterInSection:24
tableView:titleForFooterInSection:24
tableView:heightForFooterInSection:24
tableView:heightForFooterInSection:24
Next, we see a bunch of messages pertaining to one section, in this case
section 24. First the headers, then the footers. Here we have two more
examples of a twice-called method in
-tableView:heightForHeaderInSection: and
-tableView:heightForFooterInSection:.
So the order so far is as follows (eliminating duplicate invocations):
numberOfSectionsInTableView:
Then, for each section, the header and footer information:
tableView:viewForHeaderInSection:
tableView:titleForHeaderInSection:
tableView:heightForHeaderInSection:
tableView:viewForFooterInSection:
tableView:titleForFooterInSection:
tableView:heightForFooterInSection:
You can imagine that the title is not needed (and the relevant method not called) if a view is returned, so it makes sense that the view is asked for first.
Armed with our section count, the table view turns its attention to the rows, starting with … the last one?
tableView:numberOfRowsInSection:24
tableView:heightForRowAtIndexPath:{24, 0}
tableView:heightForRowAtIndexPath:{24, 1}
tableView:heightForRowAtIndexPath:{24, 2}
tableView:heightForRowAtIndexPath:{24, 3}
tableView:heightForRowAtIndexPath:{24, 4}
We have 5 rows in each section, which explains the index paths from {24, 0} through {24, 4}. The height is returned for each. So far, so good.
Now it would appear as if we’re starting at the end of the list and working our way backward, but the next thing you see is this:
tableView:viewForHeaderInSection:0
tableView:titleForHeaderInSection:0
tableView:heightForHeaderInSection:0
tableView:heightForHeaderInSection:0
tableView:viewForFooterInSection:0
tableView:titleForFooterInSection:0
tableView:heightForFooterInSection:0
tableView:heightForFooterInSection:0
tableView:numberOfRowsInSection:0
tableView:heightForRowAtIndexPath:{0, 0}
tableView:heightForRowAtIndexPath:{0, 1}
tableView:heightForRowAtIndexPath:{0, 2}
tableView:heightForRowAtIndexPath:{0, 3}
tableView:heightForRowAtIndexPath:{0, 4}
Is UITableView darting back and forth between the beginning and the end? (Answer: No. The next section it inquires about is section 1, all the way up to 23.) In fact, if you recompile this with only three sections, numbered 0 through 2, you’ll get a similar outcome with the section order: 2, 0, and 1.
So what’s happening here? Why does UITableView need to know about the last section first? [Note: Unknown! Any insights?]
sectionIndexTitlesForTableView:
Now that UITableView knows all the row heights, you shouldn’t see those called again unless the table is reloaded. That’s a good thing too because calculating those row heights can take some time, depending on the situation.
tableView:cellForRowAtIndexPath:{0, 0}
tableView:indentationLevelForRowAtIndexPath:{0, 0}
tableView:canEditRowAtIndexPath:{0, 0}
tableView:willDisplayCell:forRowAtIndexPath:{0, 0}
Next up are a series of four messages for each visible row, as well as
those just out of view above and below. Since we’re at the start of the
content area, we begin with index path {0, 0} and the messages are sent
all the way through index path {1, 3}. The familiar
-tableView:cellForRowAtIndexPath: is called first, followed by a
request for the indentation level, and a check to see if the row is
editable. Last comes -tableView:willDisplayCell:forRowAtIndexPath:.
If you’ve read the documentation, you know this is your last chance to
make final adjustments before a cell is displayed … and now we have
proof!
tableView:viewForHeaderInSection:0
tableView:titleForHeaderInSection:0
tableView:viewForFooterInSection:0
tableView:titleForFooterInSection:0
Finally, we have a set of four different messages for the view (or, failing that, the title) for the header in each visible section. You probably know that headers are always visible, even when all of a given section’s rows are not. This holds true for section footers as well, only these are kept visible on the bottom of the view instead of the top.
In the Debugger console, press return a few times to add some blank space (or just press Clear Log in the toolbar). Now let’s try and scroll another screenful of rows into view and see what happens. Click and drag the bottom-most row up to the top until Section 2, row 4 is visible. Here’s what we get. Note that we have added blank lines in between each logical group of method invocations.
tableView:viewForHeaderInSection:0
tableView:titleForHeaderInSection:0

tableView:cellForRowAtIndexPath:{1, 4}
tableView:indentationLevelForRowAtIndexPath:{1, 4}
tableView:canEditRowAtIndexPath:{1, 4}
tableView:willDisplayCell:forRowAtIndexPath:{1, 4}

tableView:viewForFooterInSection:1
tableView:titleForFooterInSection:1

tableView:viewForHeaderInSection:2
tableView:titleForHeaderInSection:2

tableView:cellForRowAtIndexPath:{2, 0}
tableView:indentationLevelForRowAtIndexPath:{2, 0}
tableView:canEditRowAtIndexPath:{2, 0}
tableView:willDisplayCell:forRowAtIndexPath:{2, 0}

tableView:viewForFooterInSection:2
tableView:titleForFooterInSection:2

tableView:cellForRowAtIndexPath:{2, 1}
tableView:indentationLevelForRowAtIndexPath:{2, 1}
tableView:canEditRowAtIndexPath:{2, 1}
tableView:willDisplayCell:forRowAtIndexPath:{2, 1}

tableView:cellForRowAtIndexPath:{2, 2}
tableView:indentationLevelForRowAtIndexPath:{2, 2}
tableView:canEditRowAtIndexPath:{2, 2}
tableView:willDisplayCell:forRowAtIndexPath:{2, 2}

tableView:cellForRowAtIndexPath:{2, 3}
tableView:indentationLevelForRowAtIndexPath:{2, 3}
tableView:canEditRowAtIndexPath:{2, 3}
tableView:willDisplayCell:forRowAtIndexPath:{2, 3}

tableView:viewForHeaderInSection:1
tableView:titleForHeaderInSection:1

tableView:cellForRowAtIndexPath:{2, 4}
tableView:indentationLevelForRowAtIndexPath:{2, 4}
tableView:canEditRowAtIndexPath:{2, 4}
tableView:willDisplayCell:forRowAtIndexPath:{2, 4}
Of particular interest here are the header and footer related methods. They appear to be invoked in a rather odd pattern, until you examine the order that each header and footer appears on screen. Then it makes perfect sense. Interestingly enough, now that we’re on the move and have stopped at a definitive spot, we never see index path {3, 0} on the radar, which is just out of view, past the bottom.
What about editing? Add some blank space in your debugger, then tap the edit button.
tableView:canEditRowAtIndexPath:{1, 1}
tableView:editingStyleForRowAtIndexPath:{1, 1}
tableView:shouldIndentWhileEditingRowAtIndexPath:{1, 1}
tableView:canMoveRowAtIndexPath:{1, 1}
We’ve already seen -tableView:canEditRowAtIndexPath: invoked, just before our last chance to adjust the cell prior to display. Now it’s the first message in the group, followed by a few additional requests. The editing style is sought, followed by a request to indent the row while editing, and rounded out by an inquiry to see if the row can be moved.
Here’s another observation. Notice how index path {1, 1} seems to be out of view in our example, yet we see it being called here. This is repeated through index path {2, 4} which is just in view, but not index path {3, 0} which is just out of view once again. Why?
There is a good reason for this behavior. When a header and footer are covering up rows within their related section (that is, when the header or footer is pegged to the top or bottom of the visible part of the view), look for a little bit of transparency, letting the underlying cells show through. When a header is directly above the first cell in its section (or when a footer is directly below the last cell in its section), there are no underlying cells to show through. In our case, we know each section has a header and footer. Thus, there is no need for fetching adjacent section/row data until at least the next section’s header comes into view.
Let’s switch Section 1, rows 3 and 4. With the debugger console in view, tap and hold index path {1, 4}, just over the three bars (signifying a movable row). Drag it upward until it switches places with index path {1, 3} but don’t let go just. Observe the log:
tableView:targetIndexPathForMoveFromRowAtIndexPath:toProposedIndexPath:{1, 3}
Had we been logging this one more completely, it would have looked like this:
tableView:targetIndexPathForMoveFromRowAtIndexPath:{1, 4}toProposedIndexPath:{1, 3}
That’s all the table view needs to do. Now let go, and the move is complete:
tableView:moveRowAtIndexPath:toIndexPath:{1, 3}
Again, a more complete log would have shown:
tableView:moveRowAtIndexPath:{1, 4}toIndexPath:{1, 3}
Tap Done in the navigation bar, and we see this:
tableView:canEditRowAtIndexPath:{1, 1}
tableView:canEditRowAtIndexPath:{1, 2}
tableView:canEditRowAtIndexPath:{1, 3}
tableView:canEditRowAtIndexPath:{1, 4}
tableView:canEditRowAtIndexPath:{2, 0}
tableView:canEditRowAtIndexPath:{2, 1}
tableView:canEditRowAtIndexPath:{2, 2}
tableView:canEditRowAtIndexPath:{2, 3}
tableView:canEditRowAtIndexPath:{2, 4}
Terrific! Now what other mischief can we cause? Let’s delete section 2, row 1 (index path {2, 1}). Add some whitespace to the console, then tap edit once again, then the red circle at the left of the cell in section 2, row 1.
tableView:titleForDeleteConfirmationButtonForRowAtIndexPath:{2, 1}
Makes sense. The delete button appears (properly labeled). Now tap it to delete the row.
tableView:commitEditingStyle:forRowAtIndexPath:{2, 1}
First, we commit the editing style for index path {2, 1}. Then we
effectively have a reloadData operation, which causes everything to be
rechecked once again - headers, footers, row heights, the works. Only
now we start at index path {0, 0} and run all the way clear through {24,
4}. So section 24 gets to go last this time!
Aaaand … the app crashes big-time.
 *** Assertion failure in -[UITableView _endCellAnimationsWithContext:], /SourceCache/UIKit_Sim/UIKit-1261.5/UITableView.m:920
 *** Terminating app due to uncaught exception 'NSInternalInconsistencyException', reason: 'Invalid update: invalid number of rows in section 2.  The number of rows contained in an existing section after the update (5) must be equal to the number of rows contained in that section before the update (5), plus or minus the number of rows inserted or deleted from that section (0 inserted, 1 deleted).'
Wha happen? Well, our faux data model still thinks there are 24 sections of five rows each. Obviously that doesn’t match up with the table view’s reality. In short, “table view fall down go boom.”
Well, it was fun while it lasted :) Get the whole source code on Github and we hope it’ll be useful to you!